1. Introduction: Why Your Samsung S34E790C Isn’t What It Used to Be
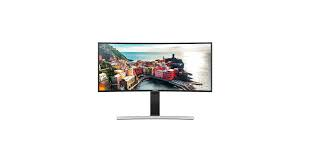
The Samsung S34E790C, released in July 2015, was a pioneer in the curved monitor space. With its 34-inch 3440×1440 UWQHD VA panel, 3000R curvature, 300cd/m² brightness, 3000:1 contrast ratio, and 4ms response time, it was a premium choice for productivity, gaming, and content consumption. Reviewers praised its impressive resolution, strong black levels, and excellent color accuracy even without calibration.
But electronics age. After 10+ years of use, even a premium monitor can develop issues. Power adapters fail. Internal capacitors degrade. Connectors wear out. This guide walks you through every step: from diagnosing common S34E790C problems, to deciding whether to repair or replace the external power adapter, and finally maintaining your monitor for years to come.
2. Tools You’ll Need Before Starting
- Working computer with appropriate video cable (HDMI or DisplayPort)
- Alternative video cable (for testing connection issues)
- Working power outlet (test with another device to confirm outlet works)
- Soft microfiber cloth (for cleaning)
- Optional: Multimeter (for testing power adapter output voltage)
- Optional: Replacement external power adapter (see Section 4 below for specifications)
- The Samsung S34E790C user manual (available for free download from Samsung‘s support website or manual repositories)
3. Step-by-Step Troubleshooting
3.1 First: Check the Power Source
The Samsung S34E790C uses an external power adapter, not an internal power supply. This means the monitor will not power on at all if the adapter or power cord fails. According to the product specifications:
Power requirements:
- AC input voltage: 100 – 240V, 50 – 60Hz (worldwide compatibility)
- External power adapter: Required
- Typical power consumption: 64W
- Maximum power consumption: 77W
- Standby power consumption: 0.5W
Check the following:
- Ensure both ends of the power cord are securely plugged in — the wall outlet end AND the connection to the DC power adapter.
- Verify the DC power adapter plug is fully seated into the monitor‘s DC-in jack.
- Test the wall outlet with another device (phone charger, lamp, etc.) to confirm it’s receiving power.
- Inspect the external power adapter for any visible damage, frayed cables, or bulging.
3.2 Second: Perform the Self-Diagnosis Test
If the monitor‘s power LED is blinking but the screen remains black — even when properly connected to a PC — Samsung’s official troubleshooting guide recommends running a self-diagnosis test:
Step 1: Power off both your PC and the monitor.
Step 2: Disconnect all video cables from the monitor (HDMI, DisplayPort, VGA).
Step 3: Power on the monitor alone (with only the power adapter connected).
Step 4: If the screen displays a “Check Signal Cable” or “Self Diagnosis” message, the monitor is working properly. This means the issue lies elsewhere — likely with your video cable, graphics card, or PC settings.
Step 5: If the screen remains completely black even with all video cables disconnected, the monitor itself has a hardware issue (power board, backlight, or main board failure).
3.3 Third: Check Video Cable Connections
Many “power” issues are actually video connection problems. The user manual specifies that if the screen is blank but the power indicator is solid or blinking, the issue may be with the cable connection between the product and PC.
What to check:
- Ensure the video cable (HDMI or DisplayPort) is securely connected at both ends.
- Try a different video cable — cables can fail internally without visible damage.
- Remove any video extension cables, adapters, or splitters between the monitor and PC, and connect directly.
- Test both HDMI ports (the S34E790C has two HDMI 1.4 ports and one DisplayPort 1.4).
Important note: The S34E790C supports 3440×1440 at 60Hz over DisplayPort, but only at 50Hz over HDMI. If you‘re using HDMI and experiencing refresh rate issues, try DisplayPort instead.
3.4 Fourth: Check Resolution and Refresh Rate Settings
If the screen turns on but displays a “Not Optimum Mode” message briefly, the monitor is detecting an unsupported resolution. The S34E790C’s native resolution is 3440×1440 at 60Hz.
What to do:
- Boot your PC in Safe Mode (press F8 during startup on Windows) or connect to a different monitor first.
- Change your PC‘s display resolution to 3440×1440.
- Set the refresh rate to 60Hz.
- If the screen remains blank after changing resolution, the manual advises changing the resolution to 1280×1024 as a temporary fallback.
3.5 Fifth: Look for Physical Damage or Warning Signs
According to Samsung‘s safety guidelines, certain signs indicate immediate action is required:
Stop using immediately and disconnect power if you notice:
- Abnormal sounds — buzzing, clicking, or high-pitched whining from the monitor or power adapter
- Burning smell or smoke — this indicates a serious electrical fault
- Visible physical damage — cracked casing, swollen power adapter, or damaged ports
- The monitor has been dropped or the outer case is damaged — turn off the power switch and disconnect the power cord, then contact Samsung Customer Service Center or a professional repair technician
3.6 Sixth: When to Replace the External Power Adapter Instead of the Monitor
The external power adapter is the single most common point of failure on the S34E790C — and the easiest to fix. If you’ve confirmed the monitor passes the self-diagnosis test (displays “Check Signal Cable” with no video input) but won‘t power on at all with your PC connected, the issue is likely the power adapter, not the monitor itself.
Signs your power adapter needs replacement:
| Sign | What It Means |
|---|---|
| Monitor powers off randomly mid-use | Adapter is failing to deliver consistent voltage under load |
| Monitor takes longer than usual to power on | Degraded capacitors in the adapter |
| Power adapter feels excessively hot | Internal components are failing — normal operating temperature should be warm but not burning to the touch |
| Monitor works with a known-good adapter but not yours | Definitive confirmation of adapter failure |
| Audible buzzing from the power adapter | Coil whine or failing transformer |
| Visible damage (cracked casing, frayed cables, bulging) | Replace immediately — continued use risks fire or further damage |
4. Choosing the Right Replacement Power Adapter
Unlike monitors with internal power supplies, the S34E790C‘s external power adapter is a replaceable component. Once you‘ve confirmed the adapter needs replacement, you have several options.
4.1 OEM Specifications
The S34E790C uses an external 100W DC power adapter. However, multiple OEM part numbers exist, and output voltages vary slightly between revisions. Always verify your original adapter’s output voltage before ordering.
| Part Number | Output Voltage | Output Current | Power | Notes |
|---|---|---|---|---|
| A10024-EPN / A10024_EPN | 22V | 4.54A | 100W | Most common; matches typical S34E790C |
| BN44-00794A | — | — | — | Alternative OEM part number |
| BN44-01137A | 23V | 4.35A | 100W | Also compatible with S34E790C |
Important note: The original power adapter for this monitor has the article number BN44-00794A. The A10024-EPN variant is widely available as a compatible replacement. However, be aware that 22V and 23V adapters are both labeled as 100W and are generally interchangeable — the voltage difference is within the monitor‘s tolerance. When in doubt, match the voltage printed on your original adapter.
Plug specifications:
- Plug size: 6.5mm × 4.4mm with a pin in the center (barrel-type connector)
4.3 What to Look for in a Replacement Adapter
- Correct output voltage: 22V or 23V DC (verify against your original adapter)
- Sufficient current rating: At least 4.35A — lower current adapters may overheat or fail under load
- Correct plug size: 6.5mm × 4.4mm barrel connector with center pin — this is critical
- Safety certifications: Look for CE, UL, ROHS, or FCC markings
- Warranty: 1-year warranty is standard for aftermarket adapters
- Reviews: Check user feedback specifically mentioning S34E790C compatibility
What to avoid:
- Universal adapters without the exact plug specification
- Adapters with output voltage below 22V or above 24V
- Unbranded adapters sold on marketplace platforms without safety certifications
- Used or “refurbished” OEM adapters — internal capacitors degrade with age regardless of external appearance
5. External Power Adapter Replacement Guide
Replacing the external power adapter on the Samsung S34E790C is the simplest repair you can perform — no tools, no disassembly required.
Step 1: Power Down and Unplug Everything
Turn off the monitor using the power button (located on the bottom edge, controlled by the JOG button). Unplug the existing power adapter from the wall outlet and disconnect the DC plug from the monitor‘s DC-in jack.
Step 2: Remove the Old Adapter
Disconnect the AC power cord from the adapter block (if detachable). Some adapters have a permanently attached AC cord; if so, simply remove the entire assembly.
Step 3: Inspect the DC-in Jack on the Monitor
Before connecting a new adapter, inspect the DC-in port on the back of the monitor for any visible damage, bent pins, or debris. Use compressed air or a soft brush to clean out any dust.
Step 4: Connect the New Adapter
Plug the new adapter‘s DC barrel connector firmly into the monitor‘s DC-in jack until it clicks or seats fully. Connect the AC power cord to the adapter (if detachable), then plug into a wall outlet.
Step 5: Power On and Test
Press the monitor‘s power button. The power LED should illuminate. If the screen remains black but the LED is on, connect a video source and test normally.
Step 6: Verify Stable Operation
Use the monitor for at least 30 minutes to confirm stable power delivery. Check that the adapter does not overheat (warm is normal; hot enough to cause discomfort is not).
6. Advanced Repair: Internal Power Board and Capacitor Replacement
If a new external power adapter does not resolve the issue — and the monitor still fails the self-diagnosis test — the problem may be on the monitor‘s internal power board.
6.1 Understanding the Power Board
The S34E790C‘s internal power board handles voltage regulation and distribution after the external adapter supplies DC power. Capacitors on this board can degrade over time, especially after 10+ years of use. Replacing potentially failing capacitors can stabilize the circuit.
Warning: Working with internal electronics carries significant risk. Samsung‘s official manual explicitly states: “Never disassemble, repair or modify the product yourself”. If you are not experienced with electronics repair, seek professional help.
6.2 Signs of Power Board Failure
- Monitor powers on intermittently or only after multiple attempts
- Screen flickers or dims erratically
- Monitor shuts down under load (when brightness is high or during gaming)
- Audible clicking or buzzing from inside the monitor (not from external adapter)
- Visible bulging or leaking capacitors on the power board
6.3 Professional Repair Options
| Option | Pros | Cons |
|---|---|---|
| Local electronics repair shop | Experienced technicians; often flat diagnostic fee | May be expensive; parts availability varies |
| Samsung authorized service center | OEM parts; manufacturer-trained technicians | Expensive; limited locations; may be cost-prohibitive for a 10-year-old monitor |
| Repair Café (free community repair events) | Free or low-cost; volunteers may have experience | Not guaranteed; may not have specific S34E790C parts |
| DIY repair (advanced users only) | Cost-effective; learning experience | Risk of electrocution or further damage; voids any remaining warranty |
7. Care and Maintenance for Your S34E790C
A well-maintained S34E790C can continue performing well beyond its 10th birthday. Follow these guidelines:
7.1 Power Adapter Care
- Keep the power adapter in a well-ventilated area — do not place it on carpet, inside enclosed cabinets, or under heavy objects.
- Avoid bending or stressing the DC cable at the point where it enters the connector — this is a common failure point.
- Unplug the adapter during thunderstorms or extended periods of non-use (more than a week).
- Do not daisy-chain power strips — plug the adapter directly into a wall outlet or a high-quality surge protector.
7.2 Monitor Care
- Clean the screen gently — use a dry microfiber cloth. Never spray liquid directly onto the screen.
- Clean the ventilation grilles on the back and bottom of the monitor every 3–6 months to prevent dust buildup and overheating.
- Keep the monitor in a temperature-controlled environment — operating temperature range is 10°C to 40°C (50°F to 104°F).
- Avoid direct sunlight on the screen — UV exposure can degrade the VA panel over time.
7.3 Connectivity Care
- Clean USB and video ports with compressed air periodically to prevent corrosion.
- Use high-quality cables — cheap HDMI or DisplayPort cables are more prone to signal degradation and intermittent connection issues.
- The S34E790C has four USB 3.0 Type-A downstream ports and one USB Type-B upstream port. If USB devices connected to the monitor are not recognized, check the upstream connection to your PC.
7.4 Calibration Notes
The S34E790C has excellent color accuracy even without calibration, according to multiple reviews. However, if you want to improve default color performance or address concerns about edge-bleeding on dark screens, calibration can unlock the monitor‘s full potential. Use the built-in “Reset All” function (available in the on-screen display menu) to return all settings to default factory configuration before recalibrating
zasilacz BN44-01137A do Samsung S34E790C LS34E790CNS/ZA
Potrzebna Ci nowa Samsung Zasilacz? Dobrze trafiłeś! Oferujemy wydajne Telewizory LED i LCD Kabel Samsung z aż 12-miesięczną gwarancją. Niska cena i bezpieczeństwo
Nasza produkcja Zasilacz Do Samsung Samsung S34E790C LS34E790CNS/ZA przechodzą rygorystyczne testy kontroli jakości. Dlatego gwarantujemy nasze produkty na okres jednego roku, dołożymy wszelkich produktów możemy sprzedać 30-dniową gwarancję zwrotu pieniędzy. Tutaj znajdziesz najlepsze Zasilacz Do Samsung BN44-01137A.